Pages

Showing posts with label sewing. Show all posts

Tuesday, April 5, 2011

Kitchen Bureau Curtains

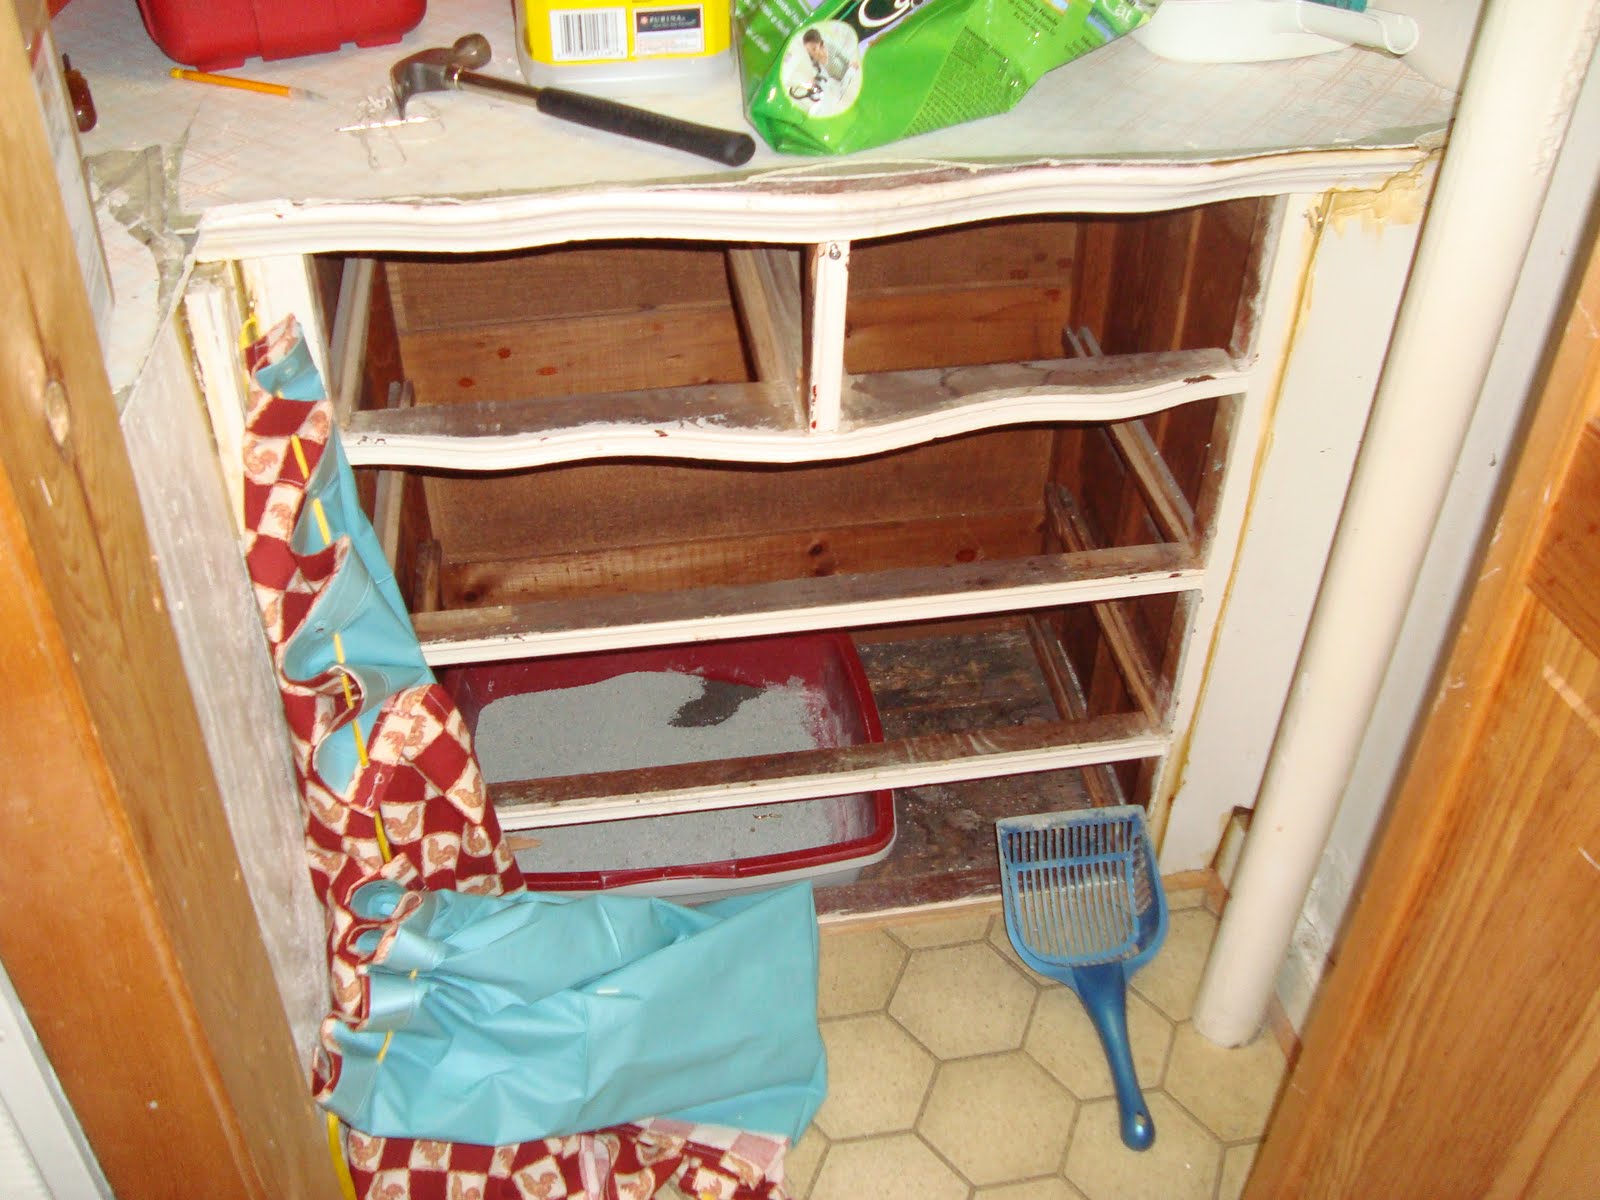
Ah. It's been a while. That's all I'll say about that. Maybe more later. Currently I am living in a pretty spacious one bedroom in Watertown with my Boyfriend and my two cats, working at a wholesale produce distributor and getting obsessed with interior decorating. The intellectual inside me (shut up shut up, I do to have a small tiny intellectual side!) will connect my need to decorate my surroundings to my family always moving around when I was a kid... but now that I'm no longer living in dorms or with roommates... I'm obsessed. Our apartment is kind of oddly designed, with one tiny window in a nook in our living room, a triangular shower and 2004 Special Edition Hustlers hidden on top of our ugly wooden kitchen cabinets. One of the main "Oh what the f*ck?" things about our apartment was definitely the bureau in the kitchen closet. This is it:


Thursday, January 17, 2008

Pretty Pretty Apron (w/link to Pattern)

This apron nearly killed me. Not because it was difficult to make (though I hate hate hate my grandmothers sewing machine with a passion now) but because my mother kept giving me helpful hints that would just confuse me and have me sitting on the floor looking at all the pieces for hours having no idea what she was talking about. Finally when i decided to ignore her, it started coming together quite nicely. I used this Craftster tutorial, though I tried to make it even cooler by adding a top... then that didn't quite come out so I left just the skirt.

I am fully aware this is not a really flattering photo and that my breasts look about the size of my head but I wanted to show where it fit on the body. I have no idea why my mother isn't capable of taking a photograph without: A) me looking terrible, B) making some wildly amusing joke concerning my breasts or C) forgetting where the Zoom and/or Shutter Button is. Anyways I actually found a bunch of awesome Apron patterns online that I am going to try out, I think these are pretty good projects for beginners. I made this one for my roommate Allie for Christmas, I think the colors will really suit her.

My Tea Wallet!


I was brainstorming things I could make for my roommate Irene for Christmas, since we're exchanging gifts when we get back to school, when I saw this post on Craftster which then lead me to THIS tutorial. Small hint btw, you have to scroll down some. Well I know Irene likes tea, she is super busy and this didn't seem too complicated to make for a beginner sewer so VIOLA! A Tea Wallet was born. I followed the directions some, but also winged it a lot but I think it didn't come out half bad. I used the same pink fabric as from my crochet hook case, but I actually bought a different hounds tooth fabric since I ran out of the other one. I didn't choose the same combo because I'm cheap, I just really think she'd like the color combination. I'm pretty proud of how it turned out.


It needs a button, I am aware. But I didn't (and still don't) have one. Also the button is going to have to be on the wrong side since I messed up a bit and attached the loop on the wrong side. I know this may sound stupid but the whole " stitching the right sides together and then turning them inside out" thing baffles me. Well not when its simple like that, but when I also want to add a loop, or ruffles... I get stuck. When I first tried to attach the loop, I attached it in such a way that when I turned the wallet right side out, the loop was no where to be seen. I am so talented. I didn't mind redoing it though because I was using my best friend Tia's super tricked out sewing machine and it was SO much fun.


My sewing machine almost literally bites. The foot pedal is super super sensitive and if I want it to go slowly I have to touch it with just my pinky. Anymore pressure and it starts going to fast that by the time I get my foot off its sewed a really wavy line across my project and some of my sleeve. Terrifying. That's why the seams on the apron I made later (on my own machine) are so crooked. I tried people! I tried SO HARD. But I'm saving up money for a sewing machine of my own so that I don't have to use my grandmothers anymore. I found a few reasonably priced sewing machines with the functions I want. Basically I just wanted a machine that has a button that you can press to sew. Like Tia's machine did. I still lust after that function. Also a speed control is very needed. We'll see, we'll see.

Thursday, January 3, 2008

Crochet Hook Case

The Finished Product:
The havoc of creating the finished product:


So I decided to sew myself a crochet hook case as a starter project on the sewing machine. I figured it would be easy, and was not even dismayed when I realized that I did not have a ruler and would have to measure and cut everything evenly by laying down a piece of white paper on top of the fabric. Then I realized that threading a sewing machine is really really difficult when you have no idea what you are doing. So is threading the bobbin because first you have to be aware of the existence of a bobbin before you can actually realize to thread it. I'm not even sure its called threading it, I think it might be winding. Knowing what a bobbin is and what it does helps as well, as you are far less likely to think "oh I don't think I REALLY need that". How foolish, how very very foolish.

(I sort of conquered the sewing machine in terms of the hook pockets, but thats mainly because they had lines I could try to stick to)

After I had the sewing machine ready and waiting I was optimistic again. Sure that took around three hours and a few bitter tears, but its going to be so much fun now, I thought. I was already imagining the pretty dress I would sew out of some scraps of fleece and a napkin, for OF COURSE I was going to master the sewing machine in like three seconds. HA. HA HA HA. Right. OK. First of all the pedal is possessed by the devil. I gently, every so cautiously put my foot down on it and the needle nearly eats my hand. Good god. How ever do you control the edges, so that the machine sews in a straight line? Never mind that, but how the h
ell are you supposed to back stitch over that same line, except now with only one hand holding the fabric and the other pressing in a button on the machine. Jesus. So basically it was really hard. Thus my Crochet Hook is not as pretty as I would have wished for it to be. Not at all.

In fact this might be the messiest and imperfect project of mine that I have ever posted. Please don't be too harsh.


I mean its pretty easy to see where I messed up. I didn't have enough of the checkered fabric left to finish the front of the needle book cover, the seams are all messed up because previously there were two layers of flannel in between the pink but that made it WAY too thick.

There are no hooks in it because I forgot them all at my bfs house in "twohoursawayfrommenowheretownMA" with my awesome scissors so I have been using my moms manicure scissor and now have the threat of death hanging over my head. Also I planned on it closing with a snap of some sort but then in a fit of rage (over yet another necessary ripping out of stitches) I ripped some of the pink material and had to just wing it. Ugh. God. Now that its done with I'm pretty proud though. I used a couple of links but since I don't really know any sewing lingo and cannot visualize half the things they were talking about in some of the crochet hook tutorials I basically winged it A LOT. Which clearly was not the best idea. Oh well. What do you think?

These are the links I used:

This is where I got the original idea to make a crochet case from!

This is what made me think it was going to be easy

This is the super complicated/detailed tutorial that made me despair

This is the blog that helped me understand how to stitch the hook pocket without the stitches showing through on the other side. A simple idea I could not understand.

And last but not least. This is the blog that helped me figure out how to make the needlebook

Maybe once I regain some of my confidence, I will try the satan machine again, and will make myself ANOTHER crochet hook case :)

Saturday, December 1, 2007

Lining Hats

Sorry I haven't posted in a while, exams got hectic and also lately I haven't been really designing anything new crochet-wise. Mainly just crocheting up promised hats to friends based on the hat pattern I had previously posted here. I tweak them to make them more individual, like making the front flap more rounded, or the ear flaps larger/smaller, switching up colors, making them without stripes.... so on and so forth. But it's still basically the same hat. I am pretty sick of hats actually. The only thing that makes making them fun is lining them, which I have just started doing.
It's all because my little brother had been complaining that his Dragon hat is itchy, which surprised me because I never really found the Wool-Ease Thick and Quick that itchy for acrylic yarn. In fact I was a tad insulted and began to doubt my crocheting skills. Thoughts like "He was lying to me, he hates my hat!" and "I am a horrible horrible crocheter if I can't even crochet a hat for a five year old" invaded my mind and caused much torment and undoing of hats. Then after hanging around him for a few days during Thanksgiving I began to doubt my logic of "Saying it doesn't feel nice equals he hates it". Mainly because that would mean he hated his coat. He hated is shoes. His sweater, his mittens and even his underwear were offensive to him. The book called "A porcupine named fluffy" aroused the deepest sentiments of loathing in him for the pages were much MUCH too stiff. So that's when I decided to learn how to line hats. I don't think I could have done it without Norma and her easy online tutorial.
My first attempt was with my friend Sarah's Hat, but the lining wasn't fleece, it was actually jersey so it was a little difficult at first to size it correctly. I used light pink embroidery floss and a reverse backstitch (which I had to learn but am now obsessed with). I don't think it came out too bad. What do you think?

Hmmm in second thought that's not exactly the world's greatest photo of it. It looks sort of bunchy and not good. But look at the front of the hat that has that beautiful display of reverse back stitch seaming and not the back of the hat which displays what happens when I realize that width-wise I have some extra fabric but length wise its a bit short. Important thing is, is it fits well, its not baggy or too tight when on, and you can't see the lining from the outside except hopefully a hint of it when I finish the ear flaps. Also my second task is to figure out how to cut fabric in a trapezoid but with ear flaps shape. This is a bit complicated as it involved buying whole yards of fabric and not 1/4 yards like I do (I am an extremely broke college student! Don't judge me!).

This is how my little brother's hat is looking. Except a tad less orange. I see this is my slightly artistic shot in where I don't use flash. Nice. Wow its fuzzy too. For those people whose vitamin C daily intake I have just upped by 40%, you are welcome and also, do not worry this is the inside of the hat. THE HAT IS TURNED INSIDE OUT! Let me try to find a less fuzzy better close up of the seams I suspect I have. No No I do not. Never mind. Just imagine the most beautiful stitches you have ever seen, and I assure you, they are in/on that hat. Poetry in motion. Yay!